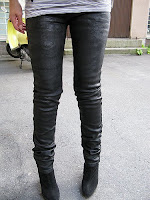
 Seguindo as diretrizes do Manifesto criado por Vivienne “In these hard times – Dress up. Do it yourself! de uma sugestão DIY. A Anna-Maria do blog fluxorist nos ensina como fazer uma Waxed jeans .Uma ótima maneira de reciclar aquele jeans que você tem encostado no armário! Veja um outro tutorial aqui! (Depois eu traduzo)
1. The jeans - Since the paint dries out really hard you should use jeans that have lost their form or are a size or two bigger than usual. Otherwise you may not fit in your jeans after the makeover.
 2. The Paint - Get black (or whatever color) acrylic paint, a brush that's made for acrylic paint and if you want to add more shine to the look, get some soft gel gloss to mix in. You will also need a cup where you mix the paint and probably some cardboard to protect your floor. Art stores sell these supplies and are willing to help, just ask them. There are cheap and expensive paint options, depends how much you're willing to spend on your project. The black paint we purchased is called Wilson & Newton: Galleria Acrylic paint, 13€. The gloss was by Golden and it is called Gel Medium Soft Gel (Gloss), 10.70€. These were huge bottles, so we could do this operation about 10 times if we wanted to.
3. Mixing the paint - Mix about 80% acrylic paint and 20% of the gloss. If you want more shiny look, add more gloss. If you want to thin then paint, add water.
4. The Paint job - Place your jeans on the floor on top the protective cardboard (or plastic). Start painting the jeans with the paint brush. Use mild strokes along the lines of the denim. You can do as many layers as you want, if you feel that the jeans didn't get the result you wanted. My boyfriend did two layers, I did just one because I wanted a bit more rougher look. Acrylic paint dries really quickly, so you can do both sides in about one hour. After finishing both sides, let the jeans dry a few hours before trying them on, just to be sure.
5. Ta dah! - Now you got yourself some waxed jeans. Pullinging them on is like putting on jeans made out of paper, so be patient and careful. With heavy use the jeans will soften up and get more comfortable, trust me on this one.
6. Washing instructions - I don't recommend that you wash your jeans but if you absolutely must, do it in cold water without any soap. I'm warning you though, the color will bleed! If you can, take the jeans to a dry cleaner.
7. Flash your jeans - There you got yourself a cool new pair of waxed jeans. Go on and flash them!
Nenhum comentário:
Postar um comentário